Sunday, 24 July 2011

Teresa Collins Stampmaker Review

On Tuesday night while casually surfing the Create&Craft site I came across the Teresa Collins Stampmaker.  It was due to launch on Wednesday morning - but I decided to take the plunge before seeing the demo (what can I say - I'm impulsive and it was double discount!)

It arrived on Friday and since then I've been having a bit of a play.

BOTTOM LINE - I LOVE it.  I've had a lot of fun and can see using this a fair bit over the next few months.   HOWEVER - there is a learning curve, and you will make mistakes (I certainly did, and my online research indicates others have) and if  that bothers you then you won't get along with this.  It's a bit messy - but as you get more experience it becomes easier to contain the mess. Or so I've found!

What You Get


 The kit comes with the light box, a magnetic clamp which you put the negative and stamp packs in for processing, a brush for cleaning your stamps after they've cooked and a little container used to 'set' the stamps in the final stage.

There's a CD - with a not very impressive video, and some instructions.  I'll be honest - I wasn't impressed with the quality of the documentation but I guess it did the job.

You also get 10 medium stamp packs, 10 small stamp packs and a couple of embossing and stencil packs (I haven't tried those yet).

There are 4 pages of Teresa Collins designed stamp negatives (some quite nice ones - and she offers new designs most months on her blog) and 2 inkjet negative sheets to use for your own designs.

My biggest quibble is that 2 sheets of the negative acetate isn't enough.  There is a real learning curve with this product and only 2 pages to print designs on inhibits you when you should be experimenting.

My Experience
I decided (foolishly) to start with a custom design and so jumped right in at the deep end!

As there were only 2 pages of negative acetate for printing I figured I shouldn't waste any so designed a full page of stamps.  A few text designs (some quotes and a 'handmade' stamp), and a black and white photo (of my parents!) to see how that would work.

I used Craft Artist and created a black background and then used white for the text to create a 'negative'. (When the stamps are made, white areas become solid creating the image.)   I used the Imagepac program on the CD to create a negative for the photograph, and then copied and pasted that into Craft Artist.  I printed the page and then attempted my first stamp.

Which was a failure!!!

I ended up with a solid piece of plastic because the negative did not fill the clamp space which allowed too much light in!

For my second attempt I used the same negative, but added a frame border around it to block out the excess light.

This was more successful - but far from perfect.  I got a stamp that had lost a little detail and had some raggedy edges.  Despondent (sort of) I did a bit of research and it seemed that maybe my negatives were not black enough.

To confirm this I made a stamp using one of the Teresa Collins negatives - and sure enough it turned out WAY WAY better.  So now I knew I needed blacker negatives.

I re-print the negatives on a different (cheaper!) printer and tried again.

Things were looking up!

The next custom stamp I made was definitely more successful and I was really beginning to enjoy myself so made a few more.

The set recommends just using the stamps directly on an acrylic block (using some tape/cling stuff they provide) but after some experimenting I found I got MUCH better results when I put the stamps onto some U-mount or EZ-mount first.

Here are a few stamped images - the clock and the bottom quote were made from Teresa Collins negatives - the other 3 are mine!!


My final experiment this morning was to make the photograph stamp - and overall I have to say I'm pretty impressed!

It's not perfect but it's good and certainly usable.


Here's the original photo and the 'pop art' images I made using my new stamp.

I used Craft Artist to 'cut out' my parents as I felt the background wouldn't work well and then added a border around the image.  I used the Imagepac softward to 'invert' the image (make it a negative) and then copied and pasted it back into Craft Artist.

I've got lots of ideas floating around in my head now and am definitely pleased with my new toy!!


Top Tips


If you do take the plunge - my top tips are:

1) the right printer and the right settings for the printer are CRUCIAL (print options should be high quality, specialist paper and greyscale/ black ink only).  The negatives that you print MUST block out light, you shouldn't be able to see through the black sections.  And black is probably blacker than you think! My first set of negatives looked black enough to me - but they weren't.

The makers of the product recommend a very cheap HP Desk Jet 1000 (£20 at Comet) - which I was lucky enough to have (it was a spare office printer that I almost gave away a couple of months ago!).  I wasn't able to get solid enough black with my more expensive Canon printer - but it might have been that I wasn't using the right settings.

2) plan the layout of any page you are printing carefully so that the images are surrounded by enough black ink and will fill the 'clamp'.  Light where you don't want it is your enemy.

3) before you make your own stamp - make one using the negatives that come with the kit. (I didn't - wish I had.)  That will help you feel confident about the equipment and the timings before you tackle custom designs.

Wednesday, 13 July 2011

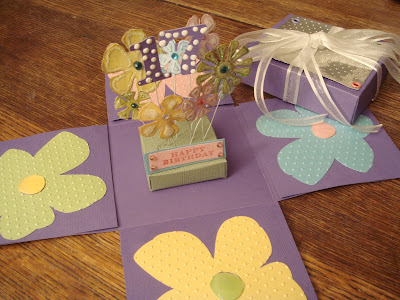
A Birthday Card

It is my god-daughter's birthday tomorrow - and as she has recently been introduced (by me) to the world of paper crafting I knew a shop bought card was not going to cut it! (In fact, when I mentioned last week that I'd have to make a trip to the card shop this week she laughed and laughed.  Apparently she wasn't going to believe I'd "run out of paper"!)


I wanted to make a really special card - and I hope this one fits the bill.

I started with my usual go-to card - some purple Core-dinations!  I made a 4x4 box and lid using my Ultimate pro Boxer.  Of course as the base of the box wasn't going to be pasted together I cut the corners out and saved them to  use on the inside walls.

I recently saw Ali Reeve use a piece of embossed tin can on a project and really liked the idea.  So inspired, I cut up a few Diet Coke tins and embossed 4 pieces using a Cuttlebug 'Happy Birthday' folder, and a fifth with the 'Swiss Dots' folder.

I attached the Happy Birthday tins to the base of the box using coloured eyelets, and the Swiss Dots to the lid, also using  coloured eyelets.

At this point I glued the lid together, and attached four pieces of ribbon (glued to the underside of the lid at the mid point of each side).  I then put the lid aside and tackled the inside of the box!

I made the base from a 4x4 piece of card, scored at 1/2" and 1" from each edge, cut out the corner pieces and then folded the paper around 4 stacked pieces of cardboard I'd cut to 2x2".

I cut 2 pieces of each of the '1' and '7' and flowers on the Imagine, the numbers from purple card, and the flowers from white card.  I used Enamel Accents to add dots to the "1" and "7", and then coloured the flowers with Distress Inks, a bit of glitter and added rhinestone centres.

I glued a piece of wire between each of the numbers/flowers and its backing piece and then let the pieces dry thoroughly.  Using a needle I poked holes for each of the stems in the base and arranged them in what I decided was a pleasing way.

I stamped 'Happy Birthday' on some pink card, matted that on to a piece of blue card, and used wire to add it to the base.

I cut four large flowers using the Imagine, embossed them with Swiss Dots and glued them to the inside of  walls of the box.  I put a bit of Glossy Accents on the flower centres.

I finished the whole thing by gluing the base into the box, folding up the sides and putting the lid on.

I think she'll love it - but I'm already worried about what the heck I'll have to do next year!

Tuesday, 12 July 2011

For a Friend

For a whole lot of reasons I have a number of friends who I owe a world of thanks to this year and slowly but surely I've been making them cards as my small way of beginning to repay the debt.

This card will go to another of those friends.

I stamped the daisies (can't remember where I got these from) with Vesa Mark, embossed with a clear embossing powder.  Then I blended Peeled Paint, Dried Marmalade and Rusty Hinge ink on the page and sprayed the whole thing with Cosmic Shimmer copper spray.  I wiped the ink off of the embossed daisies - and decided I was pleased with the result!!

I matted that page on to a piece of pearlescent card.

For the sentiment, I stamped my Hero Friend definition stamp using Stayz On rusty brown ink onto a plain card which I layered onto a piece of card I'd painted with copper mica shimmer water colour.

I attached the back of the card using 5 eyelets and added white organza ribbon through each of those.

Creative Expressions Calling Card Challenge

Creative Expressions are looking for a design team, and as part of the process have set a 'Calling Card' challenge.

From their website:

The challenge is called... Calling CardThe only requirements of this challenge are that you create a project that includes rubber stamping of some sort and that an ATC is featured somewhere in the piece. Other than that the challenge is completely open to your interpretation! 
I had a great time with this challenge - as the state of my kitchen table can attest!!

What I used:
Paper - 7x7 square base card, pink, green, black and purple Core-dinations, small scraps of colour for tickets, chipboard (or cereal box!)
Shrink Plastic
Inks - Archival, Versa Mark, gold pen
Stamps - Tim Holtz 'Fairy Tale Frenzy' for Start/Ending, Tim Holtz  'enjoy the journey', Creative Expressions Tickets, Creative Expressions Vintage Illusion set for train
Die - Spellbinders Elegant Posts
Mask - Special Touch of Mica Compass mask
Eyelets (1/8 gold, 3/16 purple), screw brad and split rings

I've ended up with a card I like to think of as "Steam Punk goes Pastel" which features a hanging ATC (Artist Trading Card) with one of my (current!) favourite 'true-isms' "No one can go back and make a brand new start. Anyone can start from now and make a brand new ending."


Making the ATC
I started with the ATC and cut a piece of purple Core-dinations card to 2.5 x 3.5 inches and lightly sanded it.

I stamped 'enjoy the journey' (a Tim Holtz stamp) using Versa Mark before embossing with a clear superfine embossing powder and a heat gun.

As I wanted the ATC to 'hang' on the card I added two purple eyelets at the top and then got to work on the embellishments.

I love love love a bit of shrink plastic so stamped my Tim Holtz 'start/ending' quote on a piece of white shrink plastic with black Archival ink.  I left the ink to dry (resisting the urge to hurry it along with a  heat gun!) before punching a hole in each of the corners.  Now I let the heat gun do its magic and was once again a 10 year old enthralled as the little piece of plastic melted and twisted and turned and looked ready for disaster before.... poof...it's a flat shrunk quote!

As the holes shrunk (obviously) I made them a little bigger so the 1/8 eyelets would fit in.

I used a gold permanent ink marker to colour the edges and add a thin border before applying a layer of Glossy Accents.  At this stage I recommend putting the piece somewhere far away from clumsy elbows and inquisitive fingers (mine) to dry completely before glueing onto the bottom right of the ATC.

To add a bit of colour to the ATC I stamped and cut out the 'Inspire/Create/Hope/Dream' tickets from some coloured cardstock.  I punched a hole in the corner of the tickets, attached them together with a screw top brad and fanned them out before glueing them to the card.

Making the Base Layer
The base of the card is 6.5 inch square of green Core-dinations which I embossed with a compass mask before sanding.

I then sanded a 6.5x4 inch piece of pink Core-dinations card and stamped the train from Creative Expressions Vintage Illusion set.

Making the Hanging Post
The hanging post is made from two Spellbinders Elegant Posts dies which I joined together to make the full shape.

Because I wanted the posts to be very sturdy so the ATC could hang from it I really needed chipboard (which I didn't have) so I improvised by using a Bran Flakes box (I expect any cereal box would work!) and cutting each of the posts 4 times (I didn't emboss these layers).  I used a sponge to apply black ink to each layer (so the edges would be black) before gluing the 4 layers together.

I then cut a final layer of the posts from black Core-dinations card which I did emboss.  I glued that  layer on the top and now had a very sturdy post!!

To finish everything off I used split rings to attach the ATC to the hanging post.  I wanted the ATC to hang freely so I attached the hanging post to the base card with Pinflair (I didn't put any glue on the ATC itself).

Put the finished piece onto a 7x7 square card and you're done!!

Look! No Distress Inks!

Just when I was beginning to doubt my ability to make a card without Distress Inks or Core-dinations this little flower card stamped its way into my collection!

I've loved the effect of ink over clear embossing since I first discovered it - but this is the first time I've used it in a card (rather than just on a random piece of paper!).

The base of the card is a piece of white card.  I stamped the flower image with Versa Mark and then embossed with a clear embossing powder.

I then covered the page  with Big & Juicy Hydrangea ink using a brayer.  (Holy messy fingers batman!  Ink everywhere! But I liked the effect.)  I wiped the ink off of the embossed area and was left wit h the lovely white image.

I then cut three small squares of white card and stamped the same flower image on to each.  I glued these onto the base of the card with some Pinflair glue.

I put the whole thing onto a 5x7 white gloss card.

Distressed but Pretty

I'm going to be honest.  I love this card.


First, it uses my favourite stamp sentiment "Life isn't about waiting for the storm to pass but learning to dance in the rain".  Second, I got to use a lot of leftover Core-dinations scraps for the flowers (cut using Spellbinders Florals) and third it's got ribbon I got to dye to match the flowers!

So although it's distressed I think it's quite pretty.

Air Dry Foam Stuff

When I attended Leonie's workshop I bought some 'super lightweight modelling clay' which I confess I wasn't entirely sure would ever get used.  Then one evening I decided to open it up - introduced it to some rubber stamps and really haven't looked back since!  My little box of  'random things I've made that I may use one day' has grown exponentially.

This week I managed to make two cards using some of those random things!


The first is the inventor card which brings a smile to my face.  I stamped the inventor (from Creative Expressions Vintage Inventor) and then added a spring stamp (sort of reminding me of toys we had as kids) using a rusty brown Stayz On ink and then cut it out, and distressed it lightly with some Antique Linen Distress Ink to remove the bright white.

I attached it to the card with a spring which means he bobbles around on the top of the card which makes me smile.

The background is some red Core-dinations card embossed with a Special Touch of Mica Cogs mask.

The large 'poster' embellishment is made from the Creative Expressions Collage stamp plate covered witih Versa Mark and then pressed into the air dry foam.  Carefully (very carefully) remove the stamp and allow to dry.  I then use some gleam to add some colour and bring out the pattern and matted it onto a piece of black card using brad screws in the corner for a bit of interest.

The 'inventor' and 'lightbulb' embellishment were also made with the air dry foam.

I matted the whole thing onto a black card.

For the second card I started by inking over the Special Touch of Mica Compass mask with Dried Marmalade, Scattered Straw and Rusty Hinge Distress Inks.  I then gave it a few spritzes of Copper Cosmic Shimmer.  I matted that onto a card I had painted with a Copper Mica watercolour.

I tore a strip brown Core-dinations paper and then sanded it gently.  I stamped 'enjoy the journey' repeatedly with Versa Mark and then embossed with clear embossing powder. I attached it to the base card with 4 gold eyelets.

I finished it off with 4 tickets made from the air dry foam and Creative Expressions Tickets stamps.

Thursday, 7 July 2011

Personal Challenge

A couple of weeks ago I was lucky enough to win second prize in a give away on Sue Wilson's blog.  Sue sent me two sets of Creative Expression stamps - Vintage Sewing and Big Game Animals.  I was delighted to win and the Vintage Sewing set appealed to me immediately.  However, I wasn't quite as drawn to the Big Game Animals as I don't do much 'scene stamping'.

Being a contrary sort of person I therefore decided that my challenge was to use the Big Game Animals set first.

I uhmmed and ahhed and played with the stamps and the giraffe quickly became a favourite.  A bit more inking and stamping and I decided I quite liked how it looked stamped multiple times and decided that would be the focal point of the card.

I had started with bright colours - which actually looked quite funky - but the arrival of a stack of Tim Holtz Core-dinations card moved me towards the oranges and browns. I finally settled on Rusty Hinge, Dried Marmalade and Antique Linen.

I layered the stamped giraffes onto a piece of plain card coloured with Walnut Stain Distress Ink.

I used my Cuttlebug and a bubble embossing folder to emboss a piece of Walnut Stain Core-dinations and sanded it lightly.  I liked the way it echoed the giraffes spots on the stamp.

I created and then printed the stand TALL in Craft Artist (stand in DuTomChe font and TALL in ColdSpaghetti BTN)(how cool is that font name?).  I cut it out and layered it onto another piece of card coloured with Walnut Stain Distress Ink.

I used some lightly sanded Rusty Hinge Core-dinations for the base card and added 3 small adhesive pearls that I coloured using a Burnt Sienna Pro-Marker.  (How is it that despite having a gazillion colours of adhesive pearls I didn't have any brown ones?)

I like the finished card even though I don't have a recipient in mind just yet.