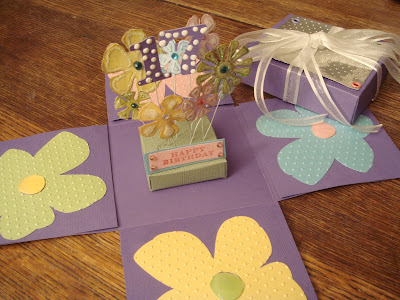
I wanted to make a really special card - and I hope this one fits the bill.
 I started with my usual go-to card - some purple Core-dinations! I made a 4x4 box and lid using my Ultimate pro Boxer. Of course as the base of the box wasn't going to be pasted together I cut the corners out and saved them to use on the inside walls.
I recently saw Ali Reeve use a piece of embossed tin can on a project and really liked the idea. So inspired, I cut up a few Diet Coke tins and embossed 4 pieces using a Cuttlebug 'Happy Birthday' folder, and a fifth with the 'Swiss Dots' folder.
I attached the Happy Birthday tins to the base of the box using coloured eyelets, and the Swiss Dots to the lid, also using coloured eyelets.
At this point I glued the lid together, and attached four pieces of ribbon (glued to the underside of the lid at the mid point of each side). I then put the lid aside and tackled the inside of the box!
I made the base from a 4x4 piece of card, scored at 1/2" and 1" from each edge, cut out the corner pieces and then folded the paper around 4 stacked pieces of cardboard I'd cut to 2x2".
I cut 2 pieces of each of the '1' and '7' and flowers on the Imagine, the numbers from purple card, and the flowers from white card. I used Enamel Accents to add dots to the "1" and "7", and then coloured the flowers with Distress Inks, a bit of glitter and added rhinestone centres.
I glued a piece of wire between each of the numbers/flowers and its backing piece and then let the pieces dry thoroughly. Using a needle I poked holes for each of the stems in the base and arranged them in what I decided was a pleasing way.
I stamped 'Happy Birthday' on some pink card, matted that on to a piece of blue card, and used wire to add it to the base.
I cut four large flowers using the Imagine, embossed them with Swiss Dots and glued them to the inside of walls of the box. I put a bit of Glossy Accents on the flower centres.
I finished the whole thing by gluing the base into the box, folding up the sides and putting the lid on.
I think she'll love it - but I'm already worried about what the heck I'll have to do next year!


Great exploding box, your god-daughter will love it. I really like the flower bouquet, I haven't seen a pop up in the middle before, so thanks for sharing. :)
ReplyDeleteLoving the embossed tin - it's so effective. It would look great on the cover of a notebook too.
ReplyDeleteLove this box, you've inspired me to try and make one for my brothers wedding in a couple of weeks!
ReplyDelete